; Supermarket Serenade: September 2008

Monday, September 29, 2008

Are Potatoes Better Than Jewelry?

Most people have lovely pieces of jewelry or sweet and sentimental old letters to remind them of past loves; I have foods to remind me of mine.
Tomato sauce reminds me of one of my favorite high school boyfriends (his mother made a really good one), there is the high school boyfriend I think of whenever I pass a McDonalds (we flipped burgers there together), or there was the boyfriend who introduced me to Lobster Bisque (the only thing he was good for). When shopping in a BJ's warehouse club the other day I saw (and promptly purchased) a food I hadn't seen since splitting with a college boyfriend from the Syracuse area of New York: Hinerwadel's salt potatoes.
Surprisingly this tasty treat seems exclusive to the Central New York region; they're small, white new potatoes boiled in about a pound of salt and then served in melted butter. In Central New York the potatoes are a mainstay at festivals and fairs and I fondly remember eating them at local pubs with an icy cold glass of beer.

I had previously never seen the potatoes here in New England-I hope they stay, they are so good. The Hinerwadel's potatoes come complete with a 12 ounce bag of salt.

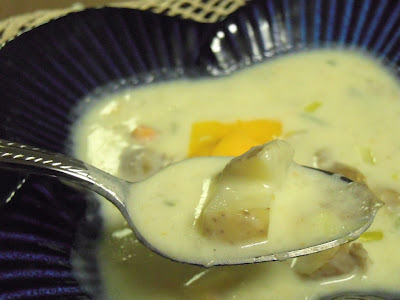
I cooked the whole bag and with the tasty leftovers made a quick Potato Leek Soup. Who needs jewelry, when there are tasty foods to remember people by?

Salt Potatoes

2 quarts water
4 1/4 pounds white new potatoes, unpeeled
12 ounces salt
1/2 cup butter, melted

Bring the water, potatoes and salt to a boil; cook until tender, about 15 minutes. Serve potatoes with the melted butter.

Quick Potato Leek Soup

1 tablespoons butter
1 carrot, finely chopped
1 cup finely chopped leeks (green and white parts)
4 cups diced cooked salt potatoes
32 ounces reduced sodium chicken or vegetable broth
1 cup half and half
1/8 teaspoon cayenne pepper
2-3 tablespoons grated cheddar cheese, optional

Melt the butter in a large sauce pan over medium heat. Stir in the carrot and the leeks; cook until tender, about 5 minutes. Add 3 cups of the potatoes and the chicken broth and cook for 10 minutes. Using an immersion blender, blend the soup to smooth out a bit (or transfer mixture to a blender or food processor and blend until almost smooth). Stir in the remaining potatoes and cook for an additional 5 minutes. Add the half and half and cayenne pepper and cook until heated through. To serve, ladle the soup into bowls and garnish with the grated cheddar.

Thursday, September 25, 2008

Barefoot Bloggers Cream of Wild Mushroom Soup


It's the last Thursday of the month and that means one thing-Barefoot Blogger Day! Barefoot Thursday comes twice a month and it’s a day when food bloggers everywhere (well about 100 bloggers right now) prepare a recipe created by Ina Garten, The Barefoot Contessa. Why don’t you join in?


Today's recipe for Cream of Wild Mushroom Soup was selected by Chelle of Brown Eyed Baker. I love this selection! Thank you, Chelle. I've made a few adjustments "supermarket style"-that is, the supermarket where I purchased my ingredients from did not have loose wild mushrooms only the packaged kind so I've adapted the recipe to match up with the package sizes available. (Sorry, Whole Foods was not on the way home from the gym). I had planned on halving the recipe anyway because as much as I love mushrooms, my kids despise them. When they grow up I'm sure they'll love them as much as I do, but for now-no soup for them.
I added a tasty Cayenne Peppered Tomato Jarlsberg Crouton which I think went really well (I could have eaten two of those, but I controlled myself).
Oh, and I didn't have any white wine so I used Marsala wine (leftover from the Chicken Marsala) with great results. Also, if you like your soup less chunky feel free to use a hand blender to smooth it out a bit, or transfer half the soup to a regular blender, blend a bit then pour back into the soup. (Be careful using a blender with hot soup-it can splatter and make a mess-I've done it...it's not pretty).
Ina's original recipe is here...below is my smaller-portion-supermarket-packaging version.

Creamy Wild Mushroom Soup with Cayenne Pepper Tomato Jarlsberg Croutons
(adapted from The Barefoot Contessa's Cream of Wild Mushroom Soup)

1 (3.5 ounce) package Shiitake mushrooms
1 (3.5 ounce) package Baby Bella mushrooms
2 teaspoons extra virgin olive oil
3 tablespoons butter
2 shallots, coarsely chopped
1/2 carrot, chopped
1 sprig of thyme plus 1/2 teaspoon minced thyme leaves
kosher salt
freshly ground black pepper
1 cup of chopped leeks (green and white parts)
2 tablespoons flour
1/2 cup Marsala wine
1 cup half and half
Croutons:
3 (1/2 inch thick) slices French Bread
3 slices of Jarlsberg cheese
1/4 cup diced tomatoes
1/8 teaspoon cayenne pepper
1/4 teaspoon salt
pinch of fresh thyme

Clean the mushrooms by rubbing gently with a paper towel. Separate the stems, trim off any bad parts and coarsely chop the stems. Slice the mushroom caps 1/4 inch thick and cut into bite size pieces.

To make the stock, heat the olive oil and 1 tablespoon of the butter in a large pot. Add the chopped mushroom stems, the shallot, carrot, the sprig of thyme, salt and pepper; cook over medium low heat for 10 to 15 minutes, until the vegetables are soft. Add 4 cups water, bring to a boil and reduce the heat and simmer uncovered for 30 minutes. Strain, reserving the liquid.

Meanwhile in another large pot, heat the remaining tablespoon of butter and add the leeks. Cook over low heat for 15 minutes until they begin to brown. Stir in the sliced mushroom caps and cook for 10 minutes or until they are browned and tender. Stir in the flour and cook for 1 minute. Add the Marsala wine and stir for another minute, scraping the bottom of the pot. Add the mushroom stock, minced thyme leaves, 3/4 teaspoon of salt and 1/4 teaspoon of pepper and bring to a boil. Reduce the heat and simmer for 15 minutes. Stir in the half and half, season to taste and heat through, but do not boil. Serve hot.

To prepare the crouton, preheat oven to 425 degrees. Arrange the bread slices in a single layer on a baking sheet. Trim the cheese to fit the bread slices and layer the cheese on each bread slice. Bake in the oven until melted, about 5 minutes. Stir together the tomatoes, cayenne pepper, salt and thyme. Spoon the tomatoes over the cheese. Serve warm with the mushroom soup.

Wednesday, September 24, 2008

Muffin Mix Fix


Muffins make the perfect little something to add to breakfasts or lunchboxes. They're compact, they're tasty, they're cute-even the name is cute: muffin.
Now while I know that there could probably be nothing easier to make from scratch than muffins-it's all in one bowl for goodness sakes, sometimes things catch your eye in the supermarket and you just have to give them a try. The something in question that recently caught my eye was a muffin mix called Fiber One Apple Cinnamon Muffin Mix.


I've tried other Fiber One things, like their cereals and granola bars with mixed results. The cereals I will often snack on and while I really like the taste of the granola bars, I'm not exactly sure what's in there, but, about half an hour after eating them I have stomach cramps and gas. Now why you ask given those results would I try another of their products? Well...I don't know exactly, but I did and I can say that the muffins were delicious and gas/cramp free.

I felt compelled to fiddle with the mix a bit and I added a cream cheese walnut component-which I thought was just right; I like a little crunch in my muffins so the addition of walnuts seemed natural. Other possible add ins could be a streusel topping or a cream cheese frosting. I did burn mine a little bit, but that's just because I was on the phone when the timer went off and didn't hear it...oops.

Fiber One Apple Cinnamon Muffins with Cream Cheese and Walnuts

6 ounces cream cheese, softened
2 tablespoons brown sugar
1 egg
1 cup chopped walnuts
1 package Fiber One Apple Cinnamon Muffin mix prepared according to package directions

Preheat oven to 400 degrees. Line a 12 cup muffin pan with paper liners.

In a small food processor, combine the cream cheese, brown sugar and egg; process until smooth. Stir in the chopped walnuts.

Divide half the Fiber One batter between the muffin cups. Spoon the cream cheese mixture over the batter in the cups, evenly dividing. Spoon the remaining batter over the cream cheese mixture.

Bake for 20-25 minutes or until golden brown and toothpick inserted in the center of each comes out clean.

Yield: 12 muffins

Monday, September 22, 2008

Express Lane Chicken Marsala


The kids have been back at school for a few weeks now and activities seem to be picking up at an exponential rate around here leaving very little time for preparing dinner. While sandwiches are a frequent solution to meals on the run in our house, sometimes I like everyone to have a nice hot dinner.

The recipe I have for today is a basic recipe for chicken Marsala that I often vary; for example tomatoes are really tasty right now, so for a garnish-even though it's not typical for Chicken Marsala, I like to add diced fresh tomatoes and some fresh basil. When tomatoes aren't as good here in New England-say in the middle of January-I will leave off the tomatoes and basil and garnish with just a bit of fresh parsley, which is a bit more traditional. I have used pre-sliced mushrooms to save some time, but feel free to slice your own. Add a bagged salad from the produce department you you are all set with a hot, quick meal.

Express Lane Chicken Marsala includes ingredients that with the exception a few staples (e.g. pasta, flour, salt, pepper) can be found by shopping the perimeter of your supermarket. So load your basket (no time for a cart today) and let's get started.

One word about the wine...don't buy the Marsala wine in the supermarket! The kind of Marsala "cooking wines" they have available in the supermarkets are really not very good and they are very high in sodium. I think it pays to invest a few extra dollars in a nice quality Marsala wine from your liquor store. If you prefer to eliminate the alcohol, just substitute some fresh lemon juice or a good quality balsamic vinegar.


Express Lane Chicken Marsala with Quick and Creamy Peppered Pasta


4 or 5 boneless, skinless chicken breasts (try to find the thin sliced ones unless you have time to pound them to 1/4 inch thickness)
1/4 cup all-purpose flour
2 tablespoons freshly grated Parmesan cheese
1/2 teaspoon freshly ground black pepper
1/2 teaspoon salt
2 tablespoons butter
1 tablespoon extra virgin olive oil
1 1/2 cup pre-sliced Shiitake mushrooms
1/4 cup dry Marsala wine
1 cup chicken broth
1 large tomato, small diced
1 tablespoon finely chopped fresh basil
Pasta:
8 ounces angel hair pasta, cooked al dente
2 tablespoons sour cream
2 tablespoons Parmesan cheese
2 tablespoons hot water from cooking the pasta
1/2 teaspoon freshly ground black pepper

Pat the chicken breasts lightly with paper towels. On a small plate or piece of waxed paper, combine the flour, Parmesan cheese, salt and pepper. Coat both sides of the chicken with the flour mixture.

Melt 1 tablespoon of the butter in the olive oil in a large skillet over medium high heat; add the chicken and brown on both sides, about 2-3 minutes per side. Remove the chicken from the skillet and add the mushrooms. Cook the mushrooms for about 2-3 minutes. Stir in the Marsala wine and the chicken broth. Cook for about 3 minutes, then return the chicken to the pan, reduce the heat to medium and cook until the chicken is cooked through, about 5 minutes. Remove the chicken from the pan and whisk in the remaining tablespoon of butter. Arrange the chicken on individual dinner plates and top with the mushrooms and sauce. Garnish each serving with diced tomatoes and fresh basil, if desired.

Toss together the pasta, sour cream, Parmesan cheese, pasta water and pepper; serve the pasta with the chicken.

Yield 4-5 servings

Thursday, September 18, 2008

Bittersweet Chocolate Coconut Bread

I have always been a tea drinker. I remember happily drinking tea with my brothers and cousins at the dining room table of my grandmother's house. The tea, thick with milk and sugar, was more of a dessert than a beverage, but I felt so grown up drinking it. Now I drink it black. Oh my sweet tooth hasn't gone away, I just prefer not to drink my sweets-I much prefer to eat them.

Bittersweet chocolate to me is the best kind of chocolate; it has a chocolate sweetness that is...well..not too sweet. This bread, a tea bread if you will, is just that-not too sweet. The texture is definitely bread-like as opposed to cake-like and I love to nibble on it in the evening with a cup of green tea.

You can usually find bittersweet chocolate in the baking section of the supermarket. I like the bar form and will usually crack it with the back end of a knife while it's still wrapped in the package-I like the non-uniformity of the pieces as opposed to using chips, but if you prefer you can substitute chips. Try to find the bittersweet chocolate, but if all else fails semi-sweet chocolate will work just fine.

Bittersweet Chocolate Coconut Bread

1 egg
1 cup milk
1 teaspoon coconut extract
2 tablespoons vegetable oil
2 1/2 cups all-purpose flour
1 teaspoon salt
1/4 cup sugar
4 teaspoons baking powder
1 cup sweetened coconut
1 (3 ounce) bar Bittersweet (not unsweetened) chocolate, crushed

Preheat oven to 350 degrees. Lightly spray a loaf pan with cooking spray.

In a small bowl whisk together the egg, milk, coconut extract and vegetable oil. In a large mixing bowl sift together the flour, salt, sugar and baking powder; stir in 3/4 cup of the coconut and the chocolate.

Using a wooden spoon, gradually stir the liquid ingredients into the dry ingredients. Spread the batter into the prepared pan and bake in the oven for 40 minutes or until a toothpick or cake tester inserted in the center of the bread comes out clean.

Wednesday, September 17, 2008

The final Martha Moments


The Martha Stewart Show continues...

We're moving over to the gardening section with blogger Margaret Roach from A way to Garden. She has some of the most beautiful pictures of gardens and wild life in the garden- especially to someone such as myself who is only capable of growing mold on old food in the fridge.

We're moving on to the final segment... I promise to post pictures! Oh wait Martha just announced that we are all getting a wireless printer courtesy of HP! How cool!!

I"m going to take pictures now!

More Martha!

Perez Hilton is on stage talking with Martha-he refers to himself as the Michael Phelps of blogging. His entertainment blog is one of the most popular blogs out there and is said to be able to make or break careers. He blogs 50 or 60 times a day! Yikes I have a hard enough time getting out a few posts a week! He was very coy about how much money he makes blogging which makes me think it's lots!

Next up Matt Bites. Matt is making cookies with Martha...he's so calm, if I were baking cookies with Martha I'm pretty sure I'd be so nervous that I'd get my spatula caught in the beaters. They are making alfajores...a buttery cookie with a dulce de leche filling..mmm.

On to crafting next with Eddie Ross. Eddie is a senior style editor at Martha Stewart Living and is currently a contestant on the reality show Top Design. He shared with Martha some cool flea market finds. He showed Martha how he makes magnets out of vintage earrings and wrapping paper out of vintage cards.

Martha!


Martha just came out to greet the audience and is letting everyone know that you can find out all about how to start your own blog on her web site.

Martha's sister is in the audience as well as Martha Stewart's magazine staff who she gave Cannon G9 cameras to.

Deb Perlman was just introduced she is the author of Smitten Kitchen she has a readership of over over 1,000,000 a month! Meg Frost of Cute Overload-how cute! She started a collection of photos and then put them online. She currently has the number one bestselling calendar on Amazon.com. Yeah we get a copy!

Coming up is one of the most famous celebrity bloggers Perez Hilton.

Live from the Martha Stewart Blogging Show!!

This is so exciting! I'm sitting here live in the Martha Stewart Show audience for a show about blogging!! Stay tuned for updates!

Monday, September 15, 2008

Linguini and Oreos


Tomorrow is National Linguine Day. I’m not sure when or why it originated, but a day devoted to pasta sounds like a good idea to me. Don't panic-I did not create a recipe combining linguine and Oreos; we ate linguine for dinner and for dessert we had an Oreo vs. Hydrox cookie showdown. But now that would be creative...linguine with an Oreo cookie mole sauce perhaps?

Since my first attempt at cooking eggplant a few days ago, I’ve made a few kinds of eggplant dishes and this one-Roasted Eggplant Linguine with Smoked Mozzarella-was a favorite. I only made enough for two, since my son decided that he was going to make homemade pizza for himself and the other two kids.

Just a few words about the Italian seasoning grinder that I’ve included in the recipe…I love this stuff. Not too long ago, McCormick came out with spice grinders: seasoned salts, peppers and pizza seasoning. The Italian seasoning (originally called Pizza Seasoning) incorporates garlic and spices and I have found that it comes in very handy when you don’t have any fresh garlic in the house. It gives a mild garlic flavor without overpowering. Of course you can go ahead and substitute fresh garlic if you have it on hand, but in a pinch the Italian seasoning comes in mighty handy, it's great for seasoning pastas, omelets, sauces and pizza. You can find the spice grinders in the supermarket spice section.

Roasted Eggplant Linguine with Smoked Mozzarella

1 small eggplant, peeled and cut into 1 inch dice
1 tablespoons extra virgin olive oil
1 teaspoon kosher salt
1/2 teaspoon freshly ground black pepper
1 cup diced tomatoes
1 tablespoon finely chopped fresh basil
1 teaspoon finely chopped fresh rosemary
Pinch red pepper flakes
6 ounces linguine shaped pasta, cooked al dente according to package directions
1/4 cup chicken or vegetable broth
1 teaspoon McCormick Italian Seasoning Grinder
1/2 cup diced smoked mozzarella cheese
1 tablespoon freshly grated parmesan cheese

Preheat oven to 375 degrees.

Spread the eggplant in a single layer on a large baking sheet and drizzle with 1 tablespoon of the extra virgin olive oil, 1/2 teaspoon of the salt and 1/4 teaspoon of the pepper. Place the baking sheet in the center of the oven and bake for 25-30 minutes or until eggplant is golden brown.


While the eggplant is cooking combine the tomatoes, basil, rosemary and red pepper flakes with the remaining salt and pepper in a small bowl.


Heat the broth in a large skillet over medium heat. Stir in the pasta, tomato mixture and the eggplant; cook for about 3 minutes. Remove from the heat and stir in the pizza seasoning and mozzarella cheese. Sprinkle the parmesan cheese over the top.

Yield: 2 servings

For dessert, we decided to have an Oreo vs. Hydrox cookie taste test.

To celebrate the 100th anniversary of Hydrox Cookies, the original cream filled chocolate cookie, Kellogg’s (the current owner of the Hydrox brand) decided to bring the cookies back.


I remember as a kid not really liking Hydrox cookies too much-I thought they tasted too waxy and tasted ironically like imitation Oreos. This incarnation of the cookies I think tastes ok. While each of us in the family were able to identify the Oreo and identify the Hydrox, it wasn’t because of the taste, it was because of the crunchiness of the chocolate wafer (the Hydrox cookie is crunchier). Ultimately the Oreo cookie won (3 to 2) because the chocolate taste of the Oreo wasn’t too overpowering. I’m pretty sure if we had thrown a double stuffed Oreo in there it would have been unanimous…what could beat a double cream filling?


Friday, September 12, 2008

Green Bean Mesclun Salad with Maple Walnut Vinaigrette

Did you ever have one of those days when you just needed a salad? Maybe you've over indulged a bit (eating a plate of mac and cheese with a full day's worth of fat and calories comes to mind for me). Or perhaps it's a warm day and you just don't want to heat up your kitchen.

Today was a salad day; one for lunch and one for dinner. I made one salad with a bit of supermarket purchased rotisserie chicken on the side and made one without.

One of the many reasons I love making salads, particularly for dinner is that I can adjust them to meet the whole family's needs. The kids, never interested in having just a salad as a meal, can have them on the side. My H and I can choose to just eat the salad or nibble on whatever else the kids are having. With the many bagged varieties available in supermarkets today, salads can be a quick, healthful meal for everyone before rushing out to dance, karate, baseball or whatever.

Super salad tips for families on the go:

Cut vegetables in the morning and store them in zippertop plastic bags with a damp paper towel then salads will be ready to assemble at a moments notice.

On nights when everyone can't eat together, make the salads in individual plastic containers with dressing in small baggies, so everyone can grab one and go.

For lunchbox salads, stuff salad mix into a pita with a bit of shredded cheese and the dressing in a small zipper top plastic bag-no fork needed!

Green Bean Mesclun Salad with Maple Walnut Vinaigrette

1/4 cup sherry vinegar
1 tablespoon pure maple syrup
1/3 cup extra virgin olive oil
1/3 cup water
2 teaspoons minced shallot
1/8 teaspoon cayenne pepper
1/4 teaspoon kosher salt
1/4 plus 1 tablespoons chopped walnuts
2 cups halved, trimmed green beans
8 cups mesclun greens
1/2 hothouse cucumber, unpeeled and cut into 1/2 thick slices
1 cup diced tomatoes

In a small food processor or blender combine the vinegar, syrup, olive oil, water, shallot, cayenne pepper, salt and 1 tablespoon of the walnuts; process until smooth.

Divide the green beans and the mesclun greens between four salad plates. Scatter the cucumbers and diced tomatoes on top. Drizzle each salad with the dressing and scatter with the remaining walnuts.

Yield: 4 salads


Thursday, September 11, 2008

Barefoot Thursday! Grown Up Mac and Cheese


Welcome to Barefoot Thursday! Barefoot Thursday comes twice a month and it’s a day when food bloggers everywhere (well about 100 bloggers right now) prepare a recipe created by Ina Garten, The Barefoot Contessa. Why don’t you join in? Today’s recipe for Grown Up Mac and Cheese was selected by Heather of Randomosity and the Girl. And oh what a fine selection it was!

Why is it that all the foods I love are so high in fat and calories? I found on a website called The Culinary Review that this recipe has 1407 calories per serving! Could that be true? I didn’t skimp on the cheese and bacon that’s for sure. I actually quintupled the recipe-not for myself (although I can shovel down Mac and Cheese with the best of them). This is my week to cook for a local women’s shelter; but now that I know that I am serving them a meal of 14,070 calories (not counting salad and dessert) I feel a tad bit guilty that I didn’t buy reduced fat cheeses.

Oh well, it sure is a tasty comfort meal though. I did make one slight change to the recipe and that was to eliminate the bread crumbs (yeah I know that’s like throwing a deck chair off the Queen Mary). But wait, I replaced the crumbs with frizzled shallots…shallots I coated with flour and cooked until crispy in some of the bacon drippings! I guess we can just go ahead and round off that calorie count to 15,000. Would anyone care for dessert?

Grown Up Mac and Cheese by Ina Garten, The Barefoot Contessa


4 ounces thick-sliced bacon
Vegetable oil
Kosher salt
2 cups elbow macaroni or cavatappi
1 1/2 cups milk
2 tablespoons unsalted butter
2 tablespoons all-purpose flour
4 ounces Gruyere cheese, grated
3 ounces extra-sharp Cheddar, grated
2 ounces blue cheese, such as Roquefort, crumbled
1/4 teaspoon freshly ground black pepper
Pinch nutmeg
2 slices white sandwich bread, crusts removed
2 tablespoons freshly chopped basil leaves
Preheat the oven to 400 degrees F.

Place a baking rack on a sheet pan and arrange the bacon in 1 layer on the baking rack. Bake for 15 to 20 minutes, until the bacon is crisp. Remove the pan carefully from the oven - there will be hot grease in the pan! Transfer the bacon to a plate lined with paper towels and crumble when it is cool enough to handle.

Drizzle oil into a large pot of boiling salted water. Add the macaroni and cook according to the directions on the package, 6 to 8 minutes. Drain well.

Meanwhile, heat the milk in a small saucepan, but don't boil it. Melt the butter in a medium pot and add the flour. Cook over low heat for 2 minutes, stirring with a whisk. While whisking, add the hot milk and cook for a minute or 2 more, until thickened and smooth. Off the heat, add the Gruyere, Cheddar, blue cheese, 1 teaspoon salt, pepper, and nutmeg. Add the cooked macaroni and crumbled bacon and stir well. Pour into 2 individual size gratin dishes.

Place the bread slices in a food processor fitted with a steel blade and pulse until you have coarse crumbs. Add the basil and pulse to combine. Sprinkle the bread crumb mixture over the top of the pasta. Bake for 35 to 40 minutes, or until the sauce is bubbly and the macaroni is browned on the top.

Wednesday, September 10, 2008

Sweet Summer Corn with Fiery Habanero-Basil Butter


I don't know about in your neck of the woods, but here in New England the corn is mighty tasty right now.


I love trying the different varieties and from a color perspective I can't decide whether or not I'm partial to the all yellow, all white or mixed kernal variety. It doesn't really matter, all I really know is that I just can't have enough of it right now. I do have a pet peeve about shopping for corn though. I hate when people take the ears of corn and pull the husks down to examine the corn and then toss it back in the bin. There are other ways to figure out if the corn is worthy of your cart. Here are a few super tips on selecting the most succulent corn:


  • Make sure the outer leaves are a vibrant green free of brown spots.


  • Look for the silk nearest the corn to be a light shade of yellow.


  • Feel the corn to make sure it is firm from end to end.

This time of year when corn on the cob is so plentiful at farmer's markets and in supermarkets, it's usually so sweet and tasty it doesn't really need anything additional-just husk, cook and go. But if you're having a special dinner or cookout and want something to make ordinary corn seem a little less ordinary, compound butters are the ticket. Prepare several varieties of butter ahead of time and let your guests choose.


Here are some super tips for cooking your corn:


Bring a pot of water to a boil, add the corn (husks and silk removed) to the boiling water, remove from the heat and let sit for at least 5 minutes or until ready to serve.

Grill the corn right in the husks, just loosen husks and remove just the silk then place the corn directly on the grill cook until charred.

Remove the husks from the corn place on a baking sheet coat lightly with oil and salt then roast in a 400 degree oven for 10 minutes.


Fiery Habanero-Basil Butter


1/2 cup (1 stick) butter, softened
2 teaspoons finely chopped habanero pepper, seeds removed
2 tablespoons finely chopped fresh basil
1/4 teaspoon kosher salt
1 1/2 teaspoons orange juice


Combine all ingredients in a small bowl; chill until ready to use.


Use about 1 tablespoon of butter for each ear of corn. Wrap any remaining butter with plastic wrap and keep it in the refrigerator or freezer. The butter would be great on grilled steak, you may want to substitute Worcestershire sauce for the orange juice though.

Tuesday, September 9, 2008

Bullies in the Produce Aisle

I love eggplant.

At Christmas time every year my sister-in-law's Italian husband prepares the most delicious eggplant rollatini. I have always been intimidated by the thought of trying to cook eggplant, so I simply dream of dinner at the in-laws all year long. In fact I almost never buy eggplant and prepare it at home, it's always been one of those things I only order in restaurants.

When I was at the supermarket the other day, there seemed to be an abundance of beautiful purple eggplants. As I caught my reflection in the glare of a particularly large eggplant's shiny skin, I said to myself "how foolish are you that you allow yourself to be intimidated by a vegetable?" I defiantly placed 2 of the shiniest eggplants in my cart.

This eggplant recipe not only makes good use of abundant eggplant, but it's also a great way to use up any fresh basil and garden tomatoes you're probably overflowing with right about now (if you're lucky enough to have a garden).

If making your own pesto is not your thing, feel free to substitute the ready made variety from your supermarket.

The stacks turned out delicious and I think I showed the vegetables in the produce aisle that I won't be intimidated any longer....brussels sprouts, your next.


Eggplant, Tomato and Pesto Stacks

1/3 cup flour
1/2 teaspoon kosher salt
1/4 teaspoon freshly ground black pepper
1/2 cup Italian style bread crumbs
2 eggs, lightly beaten
1 medium sized eggplant, peeled and cut into 1/2 inch thick slices
Sauce:
1 1/2 cups diced plum tomatoes
1/4 cup extra virgin olive oil
3 basil leaves
Pinch red pepper flakes
Pesto:
1 1/2 cups basil leaves, packed
1 tablespoon pine nuts
1/3 cup extra virgin olive oil
1 tablespoon lemon juice
1 clove garlic
2 tablespoons freshly grated parmesan cheese

12 thin tomato slices
6 tablespoons mozzarella cheese
Basil leaves for garnish

Preheat oven to 400 degrees. Line a baking sheet with parchment paper.

Mix together the flour, salt and pepper on a small plate, pour the breadcrumbs onto another small plate and pour the beaten eggs into a shallow dish. Dredge the eggplant slices first into the flour, then into the egg and then into the breadcrumbs, coating both sides. Place the slices onto the prepared baking sheet. Bake in the center of the oven for 30-35 minutes, turning once, or until golden brown and tender.

To prepare the sauce, in a small food processor or blender, combine the tomatoes, olive oil, basil, and pepper flakes; process until almost smooth. Transfer mixture to a small saucepan and warm over medium temperature for 5-10 minutes.

To prepare the pesto, in a small food processor or blender combine the basil, pine nuts, olive oil, lemon juice, garlic and parmesan cheese; process until smooth.

Preheat an oven broiler.

To assemble the stacks, divide the pesto between the eggplant slices spreading on one side of each. Place a tomato slice onto six of the eggplant slices then top the tomato with the remaining eggplant slices (pesto side up). Top each with the remaining tomato slices then sprinkle each with a tablespoon of the mozzarella cheese. Place stacks under the broiler until cheese is melted and bubbly.

To serve, spoon a portion of the sauce onto each of 6 serving plates, top with an eggplant stack. Garnish with basil leaves and additional pesto.

Yield: 6 servings

Friday, September 5, 2008

Mini Chicken Sandwiches with Veggie Spread


Why is it that if it's little it seems to tastes better?

Well that's what my kids always thought anyway. When they were really little, I would often cut my kids sandwiches into shapes with cookie cutters and magically a turkey sandwich on whole wheat bread became worthy of being eaten. Even Oscar Mayer seemed to know what was going on in my kitchen - they came out with those Lunchables and of course my kids had to have them...they're little sandwiches, they're cute (I'm sure the candy and sugary juice drink that I would never have included in their lunch boxes helped too). I have found now that I actually prefer "little" sandwiches too, but that's probably because then I can eat two of them and feel like I'm getting away with something.

A creamy vegetable spread is the base for these sandwiches made using "cocktail bread". The spread can use any variety of vegetables. An obvious addition would be scallions-I've excluded them here because my family prefers to not have an "oniony" tasting spread. I had a hard time not eating all the spread, because it's rather tasty by itself just spread on the cocktail bread.
Fillings could vary according to your personal taste, but I've used sliced Boar's Head Chicken breast from my supermarket. Boar's Head in my opinion has the best tasting cold cuts-when we first moved here from New York I was devastated that you could not buy Boar's Head brand...but thankfully a makeover at our local Stop and Shop a few years later brought with it Boar's Head brand and all is now well.


Mini Chicken Sandwiches with Veggie Spread


Veggie Spread:
4 ounces cream cheese, softened
2 tablespoons finely chopped carrot
1/2 teaspoon finely chopped jalapeno pepper
1 tablespoon finely chopped sun-dried tomatoes
pinch of salt
Sandwiches:
16 slices pumpernickel cocktail bread (2"x2")
Romaine lettuce
1/2 pound good quality sliced chicken breast
1 large ripe tomato
1 ripe avocado, peeled, seeded and thinly slice
In a small food processor combine the cream cheese, carrot, jalapeno pepper, sun-dried tomatoes and salt; process just until combined (it's best if it's left a little chunky).

Spread a generous amount of the veggie spread onto 8 slices of the cocktail bread. Top the spread with a slice of Romaine lettuce, cut to fit the bread. Follow with a few slices of the chicken breast, a tomato slice and/or an avocado slice. Top sandwiches with the remaining bread slices.


Please don't forget to vote for my recipe on Dole Way to Snack! See the upper right hand corner of the screen for a link. I only need about 10,000 more votes to win the trip to Hawaii!!