; Supermarket Serenade: May 2008

Tuesday, May 27, 2008

I've got no kitchen blues


My kitchen was demolished today. It’s been a long time coming. The Smithsonian called. They want my 1980’s kitchen for an exhibit titled “1980’s Tile Countertops-A Retrospective of Just Wrong”. I hated those counters.

(That's my favorite blues guy Robert Cray...favorite song of his to cook by? Too Many Cooks)

So without a kitchen there probably won’t be a lot of cooking going on (that has its pluses and minuses). If it can’t be cooked on a grill, waffle iron or quesadilla maker (lo-o-ve my quesadilla maker) it’s not happening. But, we’ve gotta eat. So I will try to discover supermarket finds that can be prepared without a kitchen.

Today I’m making grilled steak wraps.

It's hard pulling dinner together without a kitchen and it seems I'll be singing the "no kitchen blues" for about two weeks. So to start off with I'm making blue cheese the find for today. I think blue cheese and beef pair beautifully together; it seems to have a tanginess that compliments the heartiness of the beef… and let’s face it blue cheese on a burger rules. Not all blue cheeses are created equal though.

· Semi-Soft – smooth and creamy in texture like Saga Blue or soft but a little crumbly like Point Reyes Blue Cheese or Maytag Blue. These cheeses are usually wrapped in foil in the supermarket.
· Firm – sturdier in form and texture with a somewhat nutty flavor, like Stilton. Firm blue cheeses will usually be wrapped in plastic wrap or sold in a “wedge” at the supermarket.


For these steak wraps I will be using a Maytag blue cheese that I found at the cheese shop in Whole Foods. It is a semi-soft style of blue cheese. But feel free to experiment with different blue cheeses. I like how nicely Maytag blue cheese melts. If you don't use all the cheese that you purchased for the wraps, my favorite thing to do with leftovers is to melt it in a small saucepan over medium low heat, add a touch of cream and then drizzle it over a mound of potato chips for a wowee, yummy side.


Grilled Steak, Spinach, Blue Cheese and Caramelized Onion Wraps

Onions:
1 large red onion, peeled
1 tablespoon butter, cut into small pieces
1 tablespoon brown sugar
1 tablespoon balsamic vinegar
1 tablespoon Worcestershire sauce
1/4 teaspoon kosher salt
1 lb. skirt steak (or your favorite grilling steak)
1 teaspoon kosher salt
1/2 teaspoon freshly ground black pepper
oil to brush the grill
4 whole wheat tortillas or wrap bread, warmed
2 cups fresh spinach, thinly sliced
8 ounces Maytag blue cheese

Preheat a grill to medium high heat.

To prepare the onions, slice the onion into thin slices and place onto a sheet of heavy duty aluminum foil. Add the butter, brown sugar, balsamic vinegar, Worcestershire sauce and salt. Seal the packet and place directly on the grill rack

Grill the onions until tender, about 45 minutes. Turn the packet occasionally to prevent the onions from burning.

Season the steak with half of the salt and pepper. Lightly brush the grill rack with oil and place the steak directly on the grill rack. Close the grill cover and cook the steak for 6 minutes. Turn the steak and cook for an additional 4 minutes for medium rare or cook until your desired doneness. Transfer the steaks to a cutting surface and let rest while preparing the wraps.

Divide the spinach between the four tortillas arranging along one side of the tortilla. Using a knife spread the Maytag blue cheese down the other side. Carefully open the onion packet, then divide the onions between the four tortillas, layering them on top of the cheese and spinach. Carve the steak into 1/2 inch thick slices and fan over the onions. Roll the tortillas around all the ingredients. Cut the wraps in half before serving.

Yield: 4 wraps

Thursday, May 22, 2008

Almond (Paste) Joy


School is winding down for the kids and each week there seems to be yet another event that I have to bake for. This week it's the senior social at my daughter's school where they invite grandparents and local seniors in for a tour of the school, entertainment by the school band and light refreshments. I made a cookie that is among my favorites at the moment-Almond Thumbprints with Chocolate Drizzle. The cookies include almond paste, a favorite ingredient of mine...in fact, I probably should have included it in my must haves in the pantry.
Almond paste is found in the supermarket usually in the baked goods section and you usually have your choice of either the canned variety made by Solo or a boxed variety made by Odense.
A while back I remember seeing almond paste made by Betty Crocker, but I have not seen that in a very long time. The Odense paste comes in a 7 ounce package while the Solo brand offers an 8 ounce can-just be sure to check your recipe so you don't end up using the wrong amount.
Perhaps it's a brand loyalty thing but I usually use the Solo one simply because that's the one my mother always used and most of the recipes I seem to make with almond paste call for 8 ounces.

I grew up in New York and became accustomed to, if not spoiled by, a wide selection of bakeries. The highlight of every family party for my brother’s and I were the bakery fresh cookies brought by friends and family in cardboard boxes tied up gift style with blue and white striped string. The cookies were always buttery, flavorful and tender crisp. In Northern Connecticut, where I live now with my own family, bakeries are scarce. "Corner bakery shop" cookies are such a wonderful memory for me but for my children their only experience with bakery style cookies is whatever we can get from our local Stop and Shop or Shaws. So with childhood memories as an inspiration a melt in your mouth butter cookie base, a rich almond filling and a sweet chocolate drizzle became my version of “just as good as(if not better than) bakery” cookies.

Almond Thumbprints with Chocolate Drizzle

3/4 pound (3 sticks) butter, softened
1 cup sugar
1 teaspoon vanilla extract
3 1/2 cups all-purpose flour
1/4 teaspoon kosher salt

Filling:
1 (8 ounce) can almond paste
3 cups confectioner’s sugar
2 egg whites
1 teaspoon vanilla

2 ounce good quality semi-sweet chocolate

1. In a large mixing bowl, using an electric mixer, combine the softened butter, sugar and vanilla. In another bowl, sift together the flour and the salt. Gradually mix the flour mixture into the butter mixture. Turn dough out onto a lightly floured surface and shape into a large disc; cover with plastic wrap and refrigerate for at least 30 minutes.

2. While dough is chilling, prepare the filling. In a large mixing bowl, using an electric mixer, break up the almond paste and combine with the confectioner’s sugar. Add the egg whites and vanilla, beating until combined; cover and refrigerate until ready to use.

3. Preheat oven to 350 degrees.

4. Roll the cookie dough into 1 inch balls and place 2 inches apart on an ungreased cookie sheet. Press a large indentation in the center of each cookie. Spoon or pipe a generous tablespoonful of the filling into each indentation.

5. Bake the cookies for 15-20 minutes or until lightly golden on the edges. Let cool for 1 minute before transferring to a wire rack to cool completely.

6. Melt the chocolate in a bowl over a simmering pot of water until smooth. Using a knife or a spoon drizzle the chocolate over the cooled cookies.

Yield: about 4 1/2 dozen cookies

Monday, May 19, 2008

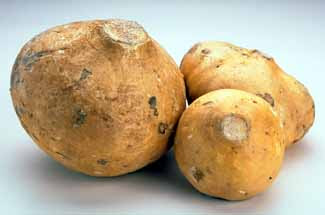
What the Jicama (hee-kah-ma) is it?


When I was a kid there was a TV show on Metromedia channel 5 in the New York metropolitan area called Wonderama. Hosted by the always jovial Bob McCallister, Wonderama was part kids talk show, part kids game show and totally the "not to be missed show" on Sunday mornings before church. Just about every kid I knew dreamed of being in the studio audience. One of my favorite segments on the show was "What the heck is it?" where Bob would hold up some unusual object and the kids in the audience would have to guess what it was. I'm not sure whether the jicama ever made it on to Wonderama, but I'm certain that the average kid or even the average adult probably wouldn't know what it was if held up for a guess.


The jicama is a tasty legume that to me is almost like a cross between an apple and a cucumber. They're grown in Mexico and South America and known by a few different names: the Mexican yam bean, Chinese turnip or Mexican potato. Jicama makes a delicious addition to salads and slaws or try slicing them thin and using them in place of crackers for hordouvres. When selecting jicama in the supermarket look for a smooth, unblemished skin and make sure it is firm to the touch.

This recipe uses jicama as a crunchy addition to chicken tostadas. You may either dice or julienne the jicama. An easy tip for preparation is to cut the jicama in half before peeling and then cut as desired.

Crunchy Grilled Chicken Tostadas with Creamy Guacamole Drizzle

4 Boneless chicken breast halves, thin sliced
Salt and pepper
1 tablespoon Red pepper flavored extra virgin olive oil
4 Corn tortillas
1 cup shredded sharp white cheddar cheese
2 cups shredded Romaine lettuce
1 cup diced or julienne jicama, peeled
1 cup diced tomatoes
1 Jalapeno pepper, minced, seeds and membranes removed

Preheat a grill to medium-high heat.

Brush both sides of the chicken breasts with the olive oil and season lightly with salt and pepper. Place the chicken on the preheated grill and cook 3-4 minutes per side or until opaque and cooked through. Remove chicken to a cutting board.

Place the corn tortillas directly on the grill rack and divide 1/2 the cheese evenly between each; close the grill and cook just until the cheese is melted, about 2 minutes.

To assemble, place the corn tortillas cheese side up on serving plates. Layer each tortilla with the lettuce, jicama, tomatoes and jalapeno peppers. Carve the chicken into thin slices and fan over the tostadas and top with the remaining cheese. Drizzle each with the Creamy Guacamole Drizzle, recipe follows.

Creamy Guacamole Drizzle
1 Ripe avocado, diced
1/2 cup sour cream
1 tablespoon lime juice
1 tablespoon finely chopped cilantro
1/2 teaspoon kosher salt
1 teaspoon hot pepper sauce (such as Tabasco)
Combine all ingredients in the bowl of a food processor; process until smooth. Drizzling tip: transfer creamy guacamole to a plastic bag, snip off a tiny corner and squeeze to drizzle over tostadas.

Wednesday, May 14, 2008

Grilled Asparagus and a Fish Story

There are two vegetables that I can genuinely say I look forward to each spring and summer: asparagus and sweet corn. It’s still too early for good sweet corn-at least it is here in New England anyway, but the asparagus I have found at the supermarket the last few weeks have been divine.


For years I would not eat asparagus. I was haunted by memories of the canned variety I was served -usually at holidays- their salty limpness was, well, nasty. It was not until being served asparagus in a restaurant that I realized what the real texture was supposed to be. My preference is tender crisp. I will lightly grill, quickly blanch or quickly roast them; but grilled is by far my favorite way to eat asparagus.

Tomorrow my daughter’s science class will be releasing salmon that they have raised from eggs, into a local tributary of the Connecticut River. I suppose it’s a little twisted, but that is what inspired me to make a salmon salad for dinner tonight. (That and I happen to think that asparagus and salmon go very well together.) Only about 10-15 percent of the salmon that they will be releasing is expected to actually survive, swim to the Atlantic Ocean and then return to Connecticut to spawn. Then I suppose they will ultimately be caught and served for dinner-oh that is twisted.

Grilled Asparagus and Wild Salmon Salad with Spiced Honey Vinaigrette

Spiced Honey Vinaigrette:
1/4 cup honey
1 tablespoon red pepper flavored extra virgin olive oil*
2 tablespoon lime juice
1/8 teaspoon cayenne pepper
1/4 teaspoon ancho chili powder
1 teaspoon finely chopped shallot
1/4 teaspoon coarse salt, such as grey salt or sea salt
Salad:
Oil to brush the grill
2 teaspoons red pepper flavored extra virgin olive oil*
20 asparagus spears
Salt and pepper to taste
4 (8 ounce) Wild Salmon fillets
8 cups baby spinach
1 cup diced grape tomatoes

*you may substitute regular extra virgin olive oil for the flavored oil

Preheat a grill to medium high heat.

For the Spiced Honey Vinaigrette, in a medium sized bowl rapidly whisk together the honey, red pepper flavored oil, lime juice, cayenne pepper, ancho chili powder and the shallot. Stir in the salt then set the vinaigrette aside.

Drizzle the 2 teaspoons of oil over the asparagus spears. Place the spears directly on the grill rack and cook, turning once or twice, until tender crisp-about 3-4 minutes. Remove the spears from the grill, slice about 2 inches off the ends of each spear. Sprinkle the asparagus tips lightly with salt and pepper. (You can save the ends to make stock if you care to).

Lightly brush the grill rack with oil. Place the salmon directly on the grill rack skin side down, close the grill and cook for 6 minutes. Using a spatula, flip the fish over and grill for an additional 2-3 minutes. Remove from the grill and season to taste with the salt and pepper.

To assemble the salads, divide the spinach between four serving plates mounding it in the center of each. Arrange the grilled asparagus spears, tips up, around the spinach. Divide the tomatoes between each salad.

Lean the salmon to the side of the spinach. Drizzle each salad and salmon portion with the vinaigrette. Add additional salt if desired and serve immediately.

Tuesday, May 13, 2008

Steaks with Hot Chili Lime Butter

Hot sauce has not always been something I would casually toss into my supermarket cart as I often do today. There was a time when I looked upon hot sauce as just that red spicy saucy stuff reserved for beer guzzling lovers of hot wings on Super Bowl Sundays. I know better now.


Hot sauce, while still fabulous slathered onto hot wings, is a spicy addition to soups, sandwiches, dressings and even eggs. (I personally cannot stomach the idea of hot sauce on eggs-or even ketchup on eggs, but that's just me).

It warmed up a bit here in the Northeast so I fired up the grill and threw on a few bone-in shell steaks. I used a unique method of preparation for the steaks that I found on Steamy Kitchen where you coat (I mean coat) the steaks with salt 15-60 minutes before grilling them, then rinse, pat dry and grill. Wow! We're talking steakhouse good! It's worth reading the whole post on Steamy Kitchen because it describes the whole process and why it makes them so tasty, but I'm telling you it was lick your lips, melt in your mouth good. I topped the steaks with a butter that I made with hot sauce and limes and served it with a quick spinach salad.

Salt-licked Steaks with Hot Chili-lime butter

2 bone in shell steaks (about 1 1/4 inch thick, 1.75 lbs total)
about 4 teaspoons kosher salt
freshly ground black pepper
2 tablespoons butter, softened
1/2 teaspoon lime zest
1/2 teaspoon lime juice
1 teaspoon hot pepper sauce (such as Franks)
1/4 teaspoon Worcestershire sauce
1/2 teaspoon finely chopped cilantro
Arrange the steaks on a baking sheet and coat each side of the steaks with 1 teaspoon of the kosher salt; let rest for 15-60 minutes.

Meanwhile prepare the butter. In a small bowl combine the butter, lime zest, lime juice, hot sauce, Worcestershire sauce and cilantro. Spoon the butter onto a sheet of plastic wrap and roll to form a log, press down gently with your finger on one side to make the log a uniform size. Chill the wrapped butter until ready to use.


Preheat grill to medium high heat. Rinse the salt from the steaks and pat dry. Season to taste with the black pepper. Place on the grill rack, close the lid and cook for 8 minutes. Turn steaks using a spatula and cook for an additional 5 minutes for medium-rare or cook until desired doneness.
Place 1 tablespoon of the butter on each of the hot steaks and serve immediately.

Note: some tasty additions to the butter might be minced shallots, scallions or garlic. For extra spiciness add 1/4 teaspoon ancho chili powder and 1/8 teaspoon cayenne pepper and have a glass of ice water ready.


Monday, May 12, 2008

Blackberries and Crystallized Ginger

Crystallized ginger goes so well with just about every kind of berry. I just love the contrast of the ginger's sweet spiciness to the tart sweetness of the berries. We're experiencing a bit of an unseasonable chill here in New England and it has me craving the warmth of tea and muffins.

The blackberries look pretty good this time of year in the supermarket, so I brought some home to make some Ginger Spiced Blackberry Muffins.


Crystallized ginger can sometimes be difficult to find in the supermarket. I usually buy it in small tubs in the produce department, often where they have pre-packaged nuts. When you buy it in the jars in the spice section it can be expensive so be sure to look in the produce section first. I can usually get a 10 ounce container (that's a lot of ginger) for around $4.00-$5.00.

Ginger Spiced Blackberry Muffins

1 1/2 cups cake flour
1/3 cup brown sugar
2 tablespoons baking powder
1/4 teaspoon salt
1/2 teaspoon ginger
1/2 teaspoon cinnamon
1/4 teaspoon cloves
1 egg lightly beaten
1/2 cup butter, melted
1/2 cup fat free milk
1 1/2 cup halved blackberries
1/2 cup thinly sliced crystallized ginger

Preheat oven to 350 degrees. Line 12 muffin cups with paper liners.

In a mixing bowl whisk together the cake flour, brown sugar, baking powder, salt, ginger, cinnamon and cloves.

Make a well in the center of the dry ingredients and add the egg, butter and milk; stir with wooden spoon, just until combined. Stir in the blackberries and the crystallized ginger.

Divide the batter between the 12 muffin cups. Bake 20-25 minutes or until lightly browned and firm.

Yield: 12 muffins


Thursday, May 8, 2008

A Nice Big Bowl of Flax Spaghetti

Please don't tell my kids...but... I've been sneaking ground flax seed into their Aunt Jemima pancake mix. In fact, I've been sneaking ground flax into just about everything I can think of lately. I can't tell them. If I told them I put flax in their usual foods they probably wouldn't eat them-they would find some reason why it tastes funny and push it aside. So when they ask what the little flecks are in the pancake batter I just smile and say "oh, probably just the eggs".


They probably won't believe me, but I only sneak things into their foods because I love them and want them to be healthy. Flax seeds are loaded with cholesterol lowering omega 3 fatty acids, they're fiber rich, immunity boosting and brain building. They'll do it too when they have kids.
Well given my flax obsession of late, it should come as no surprise that I was very excited on a recent visit to Trader Joe's to discover Trader Giotto's (isn't that clever - they made it Italian) Multi Grain Spaghetti with Flax. I couldn't wait to give it a try.


The incorporation of whole wheat pastas into our dining repertoire has been a (sneaky) gradual process. I liken it to the process of switching my whole milk loving husband over to skim milk when we were first married-first the 2% for a couple of weeks, then the 1%, then the skim-all without mentioning it of course (I'm pretty sure he still thinks he's drinking whole milk and it's been 18 years). Obviously I can't keep switching the pasta a secret-with the color difference and all, but I have tried to do it gradually by serving half regular and half whole wheat. No one seems to balk too much and now my daughter even prefers the whole wheat to the regular.

The Trader Joe's Spaghetti with Flax was fabulous; it had a slightly nutty taste without being bitter like some other whole wheat pastas can sometimes be. It's packed with 6 grams of fiber and 8 grams of protien. It's a keeper.


In my recipe below the spaghetti is tossed with a browned butter, but if you prefer you may substitute extra virgin olive oil-next time I may even try flax oil. I chose to use Grana Padano Cheese for a change instead my usual Parmigiano Reggiano, but you can use whichever you prefer - a Pecorino would work well also.


Flax Spaghetti with Brown Butter, Basil and Grana Padano Cheese
8 ounces Trader Giotto's Spaghetti with Flax
2 cups quartered grape tomatoes
3/4 cup coarsely chopped fresh basil
2 crushed Calabrese peppers (about 1/4 teaspoon red pepper flakes)
3/4 teaspoon kosher salt
4 tablespoons butter
1 tablespoon pine nuts, lightly toasted
4 ounces Grana Padano cheese, shaved
Bring 4 quarts of water to a boil. Add salt to the water to taste if desired. Stir in the spaghetti, return to a boil and cook for 9 minutes; drain.

While the spaghetti is cooking combine the tomatoes, basil, crushed pepper and salt in a bowl.

Just before draining the spaghetti, brown the butter in a large skillet over medium high heat. Stir in the drained spaghetti and the tomato mixture; cook, stirring, for 2-3 minutes. Stir in the pine nuts. Top with the shaved cheese.
Yield: 4 servings


Tuesday, May 6, 2008

The 10 Things I Could Not Live Without in my Pantry


10. Grey Salt- I have to credit Michael Chiarello for this one, he always used grey salt on his Food Network show and I became very intrigued and had to try it for myself. I’m hooked. If it’s possible for salt to taste saltier, this one does. Favorite use: summer tomatoes, fresh mozzarella, garden basil and a sprinkle of grey salt.

9. Wondra Flour- this in a pinch thickener and slurry maker has saved more than one way too thin pan sauce in my busy kitchen. It dissolves instantly, even in cold liquids. Favorite use: toss beef cubes in a Ziploc bag and shake in Wondra, salt and pepper to prepare beef for stews.

8. Sun dried tomatoes packed in oil - OK, I hear the grumbling…”they’re so 90’s”, but wait, before you cast them aside with your Chumbawumba CDs give them another chance. They are tangy, tasty and versatile. Favorite use: toss the sun dried tomatoes (oil and all) into a food processor with garlic, basil, pine nuts and lemon juice, salt and pepper for a tasty red pesto.

7. Pacific Foods Chicken and Beef Broths – by far my favorite brand for broth. They both have a clean, rich flavor that makes them a great base for soups and sauces. Favorite use: soup, any soup-I love soup.

6. Crystallized Ginger – It takes a great deal of self control on my part to not eat the entire container as a candy snack. I love the sweet spiciness. Favorite use: finely chopped and added to homemade jumbo gingersnaps.

5. Raw Almonds – A girl’s gotta snack. These cholesterol lowering antioxidant rich seeds of the almond fruit are great for snacking, but also a great addition to my favorite baked goods and savory dishes. Favorite use: ground and mixed with a bit of flour, then pressed onto fish before lightly frying.

4. Gravy Master or Kitchen Bouquet Seasoning and Browning Sauce – What can I say? I like my gravy dark. Whisk into that too light gravy and voila your gravy is transformed into a dark, rich and delicious sauce. Favorite use: when Soy Sauce is missing from my pantry I substitute a bit of seasoning and browning sauce, since soy sauce is a major component of browning sauces.

3.Tellicherry peppercorns – I am a pepper freak. I always reach for the peppermill long before I would think to reach for the salt shaker. Named for the area in India from where they are exported, Tellicherry peppercorns are the most robust peppercorns you can buy. Favorite use: freshly ground and pressed onto beef tenderloin.

2. Funky shaped pasta – Actually any shaped pasta will do. I just can’t seem to hop on the carb free bandwagon. Life without spaghetti? Life without bowties? Or worse yet, life without tortellini? I don’t think so. When you have kids in your house there are just going to be pasta days. You know, boil the water, scavenge through the fridge, see what’s fresh and toss it with hot pasta. Dinner is done. Favorite use: my ultimate I’ve had a bad day and I want a warm bowl of spaghetti meal…spaghetti, crushed tomatoes, a bit of shallot, salt, pepper, parmesan and a touch of heavy cream..

And my number 1 couldn’t live without this in my pantry item is (drum roll please)….

1. Barbara’s Bakery Puffins Cereal – Sorry if I let you down, I know it's just cereal by they’re low fat, low sugar and wheat free (not that I can’t or don’t eat wheat –see number 2). I just think the best way to start my day is with a bowl of cereal, some sliced fruit and a cup of tea. My husband thinks it’s a stretch, but, I think they taste a bit like really low sugar Captain Crunch (my childhood go-to sugary cereal that my mother never let me have or at least it seemed that way). Taste them and let me know if you agree or tell me if I’m just dreaming of sugary goodness. Favorite use: bowl, spoon, milk.

Sunday, May 4, 2008

Happy Cinco de Mayo! Beef, Chicken or Turkey?


No surprise here...it's taco night. Which kind do you prefer? Beef, chicken or turkey?

Tacos are something we will pretty much all eat in our house-beef, chicken or even turkey. Tonight, it's turkey. I sometimes get frustrated with the supermarkets in my town - they always have ground turkey, but not always ground turkey breast; and let me tell you my friends, big difference.

If I had to choose between a beef taco and a turkey taco with just regular ground turkey, I'm going with the beef-ordinary ground turkey has comparable fat and calorie counts to the ground beef so I might as well enjoy the beef. But with the ground turkey breast, there is a significant difference in fat and calories and there is no need to drain any fat-the meat just goes from pan to taco shell or tortilla.

I just love Shady Brook Farms ground turkey breast for tacos. It's 99 percent fat free and it really makes great tasting tacos-with no draining necessary. It can be a bit pricier compared with buying ground beef or even regular ground turkey-it's usually around $4.99 for 1.3 lbs.

Jennie-O makes the ground breast of turkey also and I will buy that when I can find it too. Leftovers make a really great taco salad for lunch the next day or sometimes I will toss it in some pasta with some cheese, peppers and onions to make "taco pasta".

The recipe for the spice seasoning comes from Devin Alexander's cookbook Fast Food Fix. It's a great little cookbook with recipes to make more healthful versions of fast food favorites. (My kids especially love the "Burger Chicken Tenders" from the book-they really do taste a lot like BK!

I cook the ground turkey with the spice seasoning mix and serve the tacos with an avocado pico de gallo. Muy delicioso!

Taco Bell Seasoning Mix by Devin Alexander
2 teaspoons cornstarch
1 teaspoon chili powder
1 teaspoon sweet paprika
1 teaspoon dried minced onion
1/4 teaspoon garlic powder
1/2 teaspoon salt
pinch of cumin
In a small bowl, combine the cornstarch, chili powder, paprika, onion, garlic powder, salt and cumin. Stir to mix well. Transfer to a jar or other airtight container. Store in a cool dark spot for up to 1 month.

Makes 2 tablespoons


Soft Turkey Tacos with Avocado Pico de Gallo


1 pound ground turkey
2 tablespoons "Taco Bell Seasoning" (recipe above)
2/3 cup water
8 corn or flour tortillas
1 cup shredded sharp cheddar cheese
2 cups finely chopped romaine lettuce
1 cup small dice tomatoes
1/4 cup finely diced shallot
1 jalapeno, seeds removed, minced
2 tablespoons lime juice
1 avocado, small dice
2 tablespoons finely chopped fresh cilantro
1/2 teaspoon kosher salt
1/4 teaspoon freshly ground black pepper.

Cook the turkey breast in a large non-stick skillet over medium high heat until no longer pink; stir frequently. Stir in the taco seasoning and the water. Cook until the water is almost completely absorbed, about 7-10 minutes.

Warm the tortillas on a microwave safe plate covered with a damp paper towel for 1 minute on high in the microwave.

To serve, divide the turkey between the tortillas, top with the cheese and the lettuce.

Stir together the tomatoes, shallot, jalapeno, lime juice, avocado, cilantro, salt and pepper. Spoon over the lettuce in each taco

I often serve these tacos with Margaritas for the grownups, lemonade for the kids and the Spicy Pepita Pilaf on the side, but any Mexican style rice would work well. Ole!


Friday, May 2, 2008

Free Rice, Gratis, Complimentary

As the parent of a 16 year old, with PSATs and SATs looming in the not too distant future, I'm finding it difficult to not make every interaction we have an "SAT moment". Instead of simply asking my son to take the garbage out it has to be: "S" finish the following sentence: The kitchen garbage should be transferred to
the outdoor_______. a)road b)relevant c)redundant d)receptacle.

Obviously I'm not alone in my desire to get my kids SAT ready. But one resourceful man was cleverly able to parlay a study method not just into getting his kids to do chores around the house but more significantly into a way to feed the hungry- freerice.com .

(Yeah great, I'm just worried about my own trash and this guy's feeding the world.)
If you haven't heard of it freerice.com is a nifty (addictive) site where you can donate 20 grains of rice just by selecting the correct definition to a word. It's an SAT word bonanza that I find myself playing almost everyday...in fact I just know if I took the SATs again tomorrow, this time it would be different...

On a recent break from improving my vocabulary and "winning" free rice for the hungry around the world, I found what I think is an exciting find in the supermarket to feed the hungry that I am charged with feeding on a daily basis.

I have for a while been a fan of Birdseye Steamfresh frozen vegetables , which cook perfectly in the microwave right in their bag in just a few minutes. But the other day I noticed a new option in their Steamfresh line: Steamfresh Whole Grain Brown Rice.


To me making brown rice-good brown rice, not the sometimes mushy ready in a minute rice, can be somewhat time consuming-so this caught my eye. It is prepared in the same way that the vegetables are. The rice is ready in 3 1/2 minutes but I thought it had the texture of the brown rice you've cooked for the usual 45 minutes or so. I used it for the base of a spicy pilaf tossed with shallots, celery and toasted pepitas. It was prodigious. (How's that for a nice SAT word?)


Spicy Orange Pepita Pilaf

Spicy Pepitas:
2/3 cup pepitas
1 teaspoon extra virgin olive oil
1/2 teaspoon ancho chili powder
1/8 teaspoon ground cumin
1/8 teaspoon cayenne pepper
1/2 teaspoon kosher salt
Rice:
1 tablespoon extra virgin olive oil
2 tablespoons finely chopped shallot
2 tablespoons finely chopped celery
1 teaspoon kosher salt
1 package Birdseye Steamfresh Whole Grain Brown Rice, cooked according to package directions
1 tablespoon finely chopped orange zest
2 tablespoons freshly squeezed orange juice

Preheat oven to 350 degrees.

To prepare the pepitas, in a small bowl combine the pepitas, 1 teaspoon extra virgin olive oil, ancho chili powder, cumin, cayenne pepper and kosher salt; stir to combine. Spread the pepitas onto a baking sheet and bake in the oven for 10 minutes or until lightly browned.

For the rice, in a medium sized skillet heat the tablespoon of extra virgin olive oil over medium high heat. Stir in the shallot, celery and 1/2 teaspoon of the salt; cook until tender, about 2-3 minutes.

Stir in the Birdseye rice, orange zest and orange juice; cook for an additional minute. Stir in the pepitas and season the pilaf with the remaining 1/2 teaspoon of salt.

Yield: 4-6 servings