; Supermarket Serenade: cookies
Showing posts with label cookies. Show all posts

Tuesday, October 6, 2009

Peanut Butter Lover's Cookie

I wish that I was one of those people that could eat anything. I wish also that when I baked cookies or cakes or even purchased them from the supermarket that I had that innate something that allowed you to perfectly portion treats without over indulging. What I am trying to say is that I have no self control...no ability to stop. An open package of Oreos (my true cookie love) can without much thought become an empty package. A plate of neatly stacked, homemade brownies, still warm from the oven, can become a plate of crumbs without as much as a second thought. It is for that reason that I seldom bake.

While creating irresistible treats is one of the pitfalls of baking for me, I do still enjoy baking. I love the feeling of success felt when a batch of cookies comes out just how it is supposed to. It is a great feeling when a pie recipe, once only made perfectly by my mother, comes out just how she would have made it (well, almost).

This past weekend I felt what I like to refer to as “the pull of the oven”. Not unlike the gravitational pull of the moon, the pull of the oven is the season, time of day or time of year, when for the taste of, the accomplishment of, or simply the smell of sweet “somethings” you are compelled to bake.

Given my temptation shortfall, I decided that I would bake something but it would be something that I probably would not eat. Consulting my (short) list of less-preferred baked goods, I fell upon peanut butter cookies. Not that I have anything against peanut butter-nothing tastes better on a Ritz cracker-I just for whatever reason, have never enjoyed peanut butter in baked goods. My other reason for choosing peanut butter-less self deprecating-is that I have a humongous jar of “natural” peanut butter that I purchased for my daughter to make peanut butter sandwiches for school which she has since decided is too “liquidy” and she would not use it (apparently she’s a Jif or Skippy only girl-who knew?).
Spatula in hand, I googled for peanut butter cookies looking for one that would use the most peanut butter. I found cookies that ranged from using as little as a 1/4 cup to as much as an entire jar of peanut butter. I ultimately settled on a recipe using an entire jar from AllRecipes.com. This cookie-not for the peanut butter faint of heart-packs a real peanutty flavor. Knowing that my kids would not like the crunch of added peanuts, I left out the listed 1 cup replacing it with milk chocolate chips for a “Reese’s-peanut-butter-cup-like” flavor. They came out so beautifully that yes… even I could not resist trying them. I really liked the texture; they were fluffy in the centers but slightly crisp at the edges. The taste was too peanut buttery for a non-peanut butter person such as me, but my kids really enjoyed them and recommend them highly.

My only critique of the preparation of these cookies is that when I went to make the cross marks using a fork, the fork kept sticking. Not being a regular peanut cookie baker I don't know if that's normal or not...anyway, just watch out for that! Also I followed the suggestion of one commenter on the Allrecipes site to chill the dough in a log that way you can slice and bake. It's a lot of dough though so you might want to make a few logs.

The Whole Jar of Peanut Butter Cookies
from Allrecipes.com Submitted by Kevin Ryan

1 cup butter, softened
1 cup white sugar
1 cup packed brown sugar
2 eggs
1 egg yolk
1 teaspoon vanilla
1(18 ounce) jar Peanut Butter*
2 cups all-purpose flour
1 teaspoon baking soda
1/2 teaspoon salt
1 cup chopped peanuts (which I replaced with milk chocolate chips)

*Since I was using the "natural" kind of peanut butter which is very liquidy, I only used about 16-17 ounces of peanut butter.

In a large bowl cream butter, white sugar and brown sugar until smooth. Add the eggs, yolk and vanilla; mix until fluffy. Stir in the peanut butter. Sift together the flour baking powder and salt; stir into the peanut butter mixture. Finally stir in the peanuts (or chocolate chips). Refrigerate dough for at least 2 hours.

Preheat oven to 350 degrees. Lightly grease a baking sheet. (I chose to line baking sheets with parchment paper-much easier!)

Roll dough into walnut sized balls.
Place on prepared baking sheet and flatten slightly with a fork.
Bake for 12-15 minutes in the preheated oven. Cookies should look dry on top. Allow to cool for a few minutes on the baking sheet before transferring to a wire rack to cool completely.

Makes about 5 dozen cookies.

Wednesday, September 2, 2009

Lunchboxes Filled with Love


I know the Staples commercial with the Dad dancing gleefully down the aisle of a Staple’s store tossing back to school supplies into a shopping cart would lead one to believe that most parents cannot wait for their kids to go back to school, but you know what? I’m not all that gleeful about it.

I really miss my kids when they go back. And now as they are getting older they are often seldom home because of assorted activities, friend gatherings and now my oldest has a job. So truthfully I really kind of like summer when they are around just a little bit more. But like it or not it is time to send them back to school. Two of my kids have already started and one starts next week.

When I was a kid my mother made bologna and American cheese sandwiches on soft white bread on Sunday nights. Helping her, I would usually slice the bologna into quarters so it could be arranged on the bread in a square (I hated cold cut overhang-is that obsessive compulsive?) She tucked the sandwiches in plastic bags and tossed them in the freezer and each morning, assembly line style, we would grab our sandwich, an apple and a small package of pretzels (sometimes we got cookies) then toss it all in a brown paper bag (I tossed it in my Brady Bunch Lunchbox in the early years).
I don’t quite have the assembly line system my mom had and truthfully my kids do not always like to take their lunch…and certainly only my youngest has a lunchbox (albeit a Vera Bradley one which really looks more like a purse). But lunch usually is not too much different than what I got: a sandwich-but now it is turkey and American cheese on wheat, an apple, pretzels and the occasional treat. Today I have made two treats which I will likely slip into plastic bags and freeze for lunches. Whether I toss these treats into a lunchbox or simply serve them up after school, hopefully my kids will get the message that in school or out of school I love them.

Maple Almond Cinnamon Chip Banana Bars

2 1/4 cups all purpose flour
2 teaspoons baking powder
1/2 teaspoon salt
3/4 cup butter
1/2 cup sugar
1/4 cup brown sugar, light, firmly packed
1/4 cup maple syrup
2 medium bananas, peeled and mashed
1 egg
1/2 cup sliced almonds
1/2 cup Cinnamon chips

Preheat an oven to 350 degrees. Line a rimmed 15 ½ x10 ½ inch baking pan with parchment paper.

In a large mixing bowl whisk together the flour baking powder and salt. In another large mixing bowl beat together the butter and sugars with an electric mixer until light and fluffy, about 3 minutes. Add the maple syrup, bananas and the egg, beating until combined. Add the flour mixture a little bit at a time, beating after each addition until combined. Stir in the almonds and cinnamon chips.

Spread the batter evenly over the prepared pan, don’t worry if it’s not perfect just spread it as evenly as possible.
Bake 15-20 minutes or until golden brown. Cool completely before frosting or cutting into squares. Store bars in a covered container.
Note: bars are very thin...if you would prefer slightly thicker bars, bake them in a 13x9 inch pan.

Brown Sugar Cream Cheese Frosting (optional)

1(8 ounce) package of reduced fat cream cheese
1/3 cup brown sugar
1 teaspoon maple syrup

Combine all ingredients in a mixing bowl and beat until smooth.

Crispy Peanut Butter Lunchbox Bars

1 cup creamy peanut butter
1 cup marshmallow topping
4 tablespoons butter
3 cups puffed rice cereal
4 ounces dark chocolate

Lightly spray an 8x8 square dish with cooking spray.

In a large saucepan melt the butter, marshmallow topping and butter, stirring to combine.

Stir in the puffed rice cereal. Press the mixture into the prepared dish. Let cool completely before cutting into squares.

Melt the chocolate in a glass bowl placed over a pot of simmering water. Using a knife, drizzle the chocolate over the squares. Let the chocolate firm before eating (unless you really can't wait).

Monday, July 20, 2009

What can I bake with surplus M&M's?

I love it when a new movie comes out and candy companies like M&M/Mars roll out collector edition versions of their candies. While I am a big movie goer (and proud to say a charter member of Netflix) I am not what you would call a collector of movie paraphernalia so it’s not for that reason that I get excited; but rather it is because 9 times out of 10 a few weeks down the road when the movie is but a distant memory and the American consumer has moved on to the next big thing the collector packages go on clearance.

Such is the case with my recent purchase of M&M’s Transformer’s Revenge of the Fallen (was that really a movie? No one in my house cared) I was able to nab a few bargain bags of half priced Transformer M&M’s!

While I easily could have inhaled each bag, (I am in fact an M&M addict-plain not peanut…sometimes almond…never dark and certainly never those over-priced M&M premium flavors.) I showed constraint and decided to look for some recipes that used M&M’s. (Yeah that’s it"…kids don’t eat them, Mom bought them to bake with.")

As luck would have it my cooking contest/blogger friend Anna from Cookie Madness had a yummy (easy) recipe on her blog for Chocolate Chip Pretzel Bars so I gave them a go. I made one slight alteration-I replaced half of the semi-sweet chocolate chips with butterscotch chips (I sure do love those butterscotch chips). Not surprisingly the bars were loved by all. My daughter thought that they would make a delicious base for an ice cream sundae while they were still warm…unfortunately we only had mango sorbet in the fridge…ahhh..next time. OK so that takes up about 1/2 cup of M&M’s any suggestions on things to make with remaining? (I bought 3 bags...c'mon...they were on sale!!)

Chocolate Chip Pretzel Bars
by Anna at Cookie Madness (from Food & Wine)
1 cup all purpose unbleached flour (135 grams)
1/2 teaspoon baking soda (2 ml)
1/4 teaspoon salt (1 ml)
6 tablespoons unsalted butter (85 grams)
1/2 cup light brown sugar (110 grams)
1/4 cup granulated sugar (48 grams)
1 teaspoon vanilla (5 ml)
1 large egg
3/4 cups pretzels, broken
1 cup semi- sweet chocolate chips
1/3 cup M&Ms (plain) – more if you want

Preheat oven to 350 degrees F. Line an 8 inch metal pan with foil and spray with cooking spray (or use parchment).

Mix together the flour, soda and salt; set aside.

Beat the butter and both sugars in a mixing bowl. When light, beat in the vanilla. Add the egg and beat until it’s mixed, then gradually stir in the flour mixture, followed by the pretzel pieces, chocolate and M&Ms.
(I don't normally like to eat cookie dough because my mom warned me about the raw eggs and all, but this m&m studded dough was pretty darn tempting)
Spread mixture evenly in pan and bake on center rack for about 25 minutes or until golden brown. Let cool completely. Lift from pan and cut into bars.

Friday, March 20, 2009

Jumbo Triple Chippers

It seems that almost every time I go to bake something that uses chocolate chips I open the cabinet only to find that someone has eaten half the bag of chocolate chips; it's just annoying. I have a sweet tooth myself but for whatever reason when it comes to eating chips for baking I can resist...except for one kind: the butterscotch chips.

Today is Favorite Food Find Friday and today's find is none other than the irresistible Nestle Butterscotch chips. The chips are golden brown with a unique caramel flavor.
They're not always easy to find so when I do I buy a few bags and hide them so when I need them they'll be there. I love the traditional Oatmeal Scotchies and I really love creamy butterscotch fudge.
Jumbo Triple Chippers

This recipe is one a good friend of mine cut out years ago from a newspaper. But after a minor bit of research it turns out it's basically the Toll House Cookie recipe with a tablespoon of sour cream added, a little extra vanilla and margarine and shortening instead of the butter. (Not sure what the sour cream is all about...and with so little added, if you don't have it in the house just leave it out.) My friend is a wonderful baker and for our last book group meeting she decided to serve all desserts and she made these wonderful jumbo cookies. The only change I made was to replace milk chocolate and butterscotch chips for the semi sweet chips called for in the recipe...and let me tell you just that little change sends these cookies from great to superb...but then I can't resist a butterscotch chip.

2 1/4 cup flour
1 teaspoon baking soda
1 teaspoon salt
1/2 cup margarine
1/2 cup butter flavored shortening
3/4 cup sugar
3/4 cup brown sugar
1 tablespoon sour cream
1 1/2 teaspoon vanilla extract
2 large eggs
3/4 cup semisweet chocolate chips
3/4 cup milk chocolate chips
3/4 cup butterscotch chips

Preheat oven to 350 degrees. In a medium sized bowl sift together the flour, baking soda and salt.

In a large mixing bowl using an electric mixer beat the margarine, shortening and sugars until light and fluffy. Add the sour cream, vanilla and eggs and beat until combined. Gradually add the flour mixture to the butter mixture, beating just until combined. Stir in the chips.

Scoop the cookie dough by 1/4 cupfuls 3 inches apart onto a baking sheet; press down slightly to flatten. Bake the cookies 12-14 minutes.


Makes 14 jumbo cookies

Friday, January 30, 2009

Mini Brownie Bites

The Superbowl isn't just about appetizers your party needs a sweet ending. Today-Favorite Food Find Friday-is not really about a food exactly it's about something that you use to cook food. Today's favorite find is.....

Wilton's new Bite-Sized Brownie Squares-an awesome silicone baking pan that creates perfectly uniform bite sized brownies!
Embarrassingly this is my first time using a silicone baking pan; I was for some reason immediately drawn to it in the store and It was pretty good. I baked the brownies, cooled them and then easily popped out my bites! No messy brownie slicing required and a perfectly uniform result.
I followed a recipe that I found on All Recipes by Eagle Condensed Milk and while the result is tasty it was a bit labor intensive. The original recipe was for brownie bites-made by using a melon baller to shape bite-sized brownies (which I also made). The instructions called for "dipping" the brownies into the melted chocolate, but I really found it difficult to "dip" the chocolate-it was rather thick-so I just spread it on with a small spatula. I then decorated the bites with a butter cream frosting. While they look OK, I have learned that cake decorating is not my thing.
I'm hoping to score a field goal at least with these tasty hand held treats!

Mini Elegant Brownie Bars
adapted from All Recipes

1 (19.8 ounce) package brownie mix
1 (14 ounce) can sweetened condensed milk
8 ounces semi-sweet chocolate
1 teaspoon butter
1 teaspoon vanilla
Butter cream:
1/4 cup shortening
1/4 cup butter, softened
2 cups powdered sugar
1/2 teaspoon vanilla extract
1-2 tablespoons milk

Preheat oven to 350 degrees. Lightly spray brownie square pan and an additional small baking pan with cooking spray. Prepare the brownie mix as directed on the box. Spoon a tablespoonful into each brownie square section in the pan. Pour any additional batter into the additional small pan. Bake in the oven for 20-25 minutes or until a cake tester inserted in the center of each brownie square comes out clean. Allow brownies to cool before popping out of brownie square pan.

For the brownies cooked in the extra small pan, use a melon baller and scoop the brownies into small rounds.
In a medium saucepan heat the sweetened condensed milk over medium heat. Add the chocolate and stir until melted. Stir in the butter and vanilla. Keeping the chocolate warm, dip the brownies into the chocolate to coat or spread the chocolate on with a small spatula.
Place brownies on a wire rack to dry. When chocolate is set, decorate with the butter cream.

In a mixing bowl with an electric mixer, beat together the shortening and the butter until smooth and fluffy. Add the powdered sugar 1/2 cup at a time, beating after each addition. Stir in the vanilla and the milk. Transfer butter cream to a decorating bag with desired decorating tip and pipe frosting onto brownies.

Friday, December 19, 2008

Favorite Food Finds Friday

All week long I have been baking and shopping, baking and shopping. (Did you notice I didn't say posting?) One day was even devoted to a group bake where a few friends and I got together and made multiple batches of three different cookies: Pecan Tassies, those "pretzel/kiss/mm things and a favorite of mine...The Barefoot Contessa's JamThumbprints. When I came home I was still in a baking mood so I baked my very favorite holiday cookie which I will share with you soon: Cherry Macaroon Puffs-they are very special cookies to me...

Baking with friends really made it less like work and more like an event. My friend Sue made everyone delicious paninis with her griddler and we enjoyed an afternoon of baking together and since it was at her house I didn't have a messy kitchen to clean up!! (Thanks, Susie!).

Ok I'll get to my favorite food find....it has to do with baking-sort of. I love to make fudge for gifts around the holidays and this year I used a favorite food find to create a tasty variation of the fudge recipe from the side of the Fluff tub. (Fluff isn't the Friday favorite but it does count as a favorite food find though...who doesn't love that sticky, sweet, velvety white treat??)

This week I love.....McCormick Gourmet Collection Chai Spice Blend! I replaced the semi-sweet chocolate chips with white chips and stirred in a teaspoon of the spice mixture to create what I am calling Chai Latte Fudge. Once the fudge is firm and you've cut it into squares, you can either serve it as is or for an extra pretty touch you can sift unsweetened cocoa powder over the squares. It's a melt in your mouth treat-perfect for teachers gifts or for your neighbors.

Chai Latte Fudge

5 cups sugar
1 1/4 cups evaporated milk
1/4 pound butter (1 stick), cut into tablespoons
1 (16 ounce) container Marshmallow Fluff
1 teaspoon salt
1 1/2 teaspoon vanilla extract
2 (12 ounce) packages white baking chips
1 teaspoon Chai Spice Blend
Line a 13x9 inch pan with aluminum foil leaving the edges of the foil hanging out of the pan. Lightly spray the foil with cooking spray.


Combine the sugar, evaporated milk, butter, Fluff, salt and salt in a large sauce pan. Stir over low heat until blended.

Bring mixture to a boil over medium heat, stirring. Being careful not to mistake escaping air bubbles for boiling. Then boil slowly, stirring constantly, for 5 minutes.


Remove from the heat. Stir in the vanilla, baking chips an the Chai Spice Blend. Pour into the prepared pan. Allow to cool at room temperature.

Yields: about 5 pounds of fudge

Store the fudge covered at room temperature. I don't like my fudge chilled...but hey, that's just me.

Wednesday, December 10, 2008

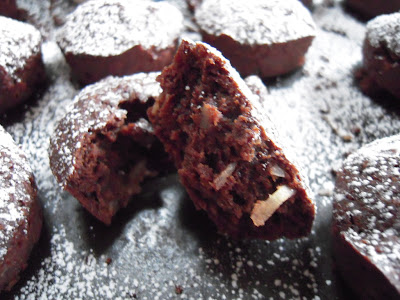
Snow-Capped Coconut Fudge Bites

Cookie number two!!

Next up is a rich chocolaty coconut treat! These bite-sized brownie like treats couldn't be any simpler to make and they are a favorite of mine-I love anything chocolate and coconut.

There are a few things you need to keep in mind during cookie week:

These are cookies, not diet food...so yes they're full of sugar and butter! (Everything in moderation, right?)
When you are storing your cookies, wrap each cookie separately otherwise they all start to taste the same.
If you are planning on freezing cookies that are coated with powdered sugar, plan on sprinkling a little extra after thawing.

Snow-Capped Coconut Fudge Bites
1 cup butter, softened
1 (11.5 ounce) package Bittersweet (not unsweetened) chocolate
1 cup sugar
1/3 cup heavy cream
1 teaspoon coconut extract (you may substitute vanilla extract)
3 large eggs
1 cup flour
1 cup shredded coconut
1/4 cup powdered sugar

Melt the butter and chocolate in a medium sized saucepan over medium heat, stirring frequently; cool completely.

Using a large spoon, stir in the sugar, heavy cream and coconut extract; stir until well combined. Add the eggs one at a time, stirring after each until incorporated. Gradually stir in the flour and the coconut.

Preheat oven to 350 degrees. Spray a mini muffin pan lightly with cooking spray. Spoon the batter into the cups filling each 2/3 full. Bake in the oven 14-16 minutes or until a toothpick inserted in the center comes out clean.

Gently remove bites from the pan and transfer to wire racks to cool completely.

Makes about 48 bites.

Note: Let the cakes cool for 5 minutes in the pan before gently removing bites and transferring to the wire rack to cool completely. Use a small spatula or knife to remove the bites being careful to not not break them. The "cookies" will be slightly crisp on the outside and tender on the inside.

Friday, November 14, 2008

Favorite Food Finds Friday!

Today's favorite find is a special fruit that is plentiful in the produce aisle only from early November to early February....Clementines!

Clementines, usually found near the regular oranges and packed in small crates, are a small (usually seedless) easy to peel variety of mandarin oranges.

Because of their compact size, Clementines make the perfect lunchbox treat or snack. And while they are perfect to eat on their own, I decided to use them to in a "lemon bar" variation with great results. I adapted a recipe from Gourmet Magazine using the clementines instead of lemons.

Today is my day to cook for a local woman's shelter and I'm bringing these bars for dessert, I have to keep them chilled so I don't want to sprinkle the powdered sugar until the last minute...which is a tip: don't add the powdered sugar until shortly before you are planning on serving them. Now don't freak when you see that the recipe calls for 3 sticks of butter (OK you can freak a little)...you have to keep in mind that this recipe makes about 48 bars.
Super tips: look for crates of Clementines with colorful orangish-red fruit clear of blemishes. Store them at room temperature for up to a week or refrigerate them for up to about 2 weeks.
Darling Clementine Bars (adapted from Gourmet Magazine)

Crust:
4 cups all-purpose flour
1 cup granulated sugar
1/2 teaspoon salt
3 sticks of cold butter, cut into 1/2 inch pieces
For Filling:
6 large eggs
1 cup granulated sugar
1/4 cup all-purpose flour
1/4 cup heavy cream
1 tablespoon finely grated clementine zest
1/2 cup freshly squeezed clementine juice
1/4 teaspoon salt
Confectioner's sugar

Preheat oven to 350 degrees.

Pulse together the flour, sugar, and salt in a food processor just until combined. Add butter and pulse until the mixture resembles coarse crumbs. Press the dough into the bottom of an ungreased 13x9 inch baking pan. (I used the measuring cup to help press it down).
Bake until lightly browned, about 20 minutes.

For the filling whisk together the eggs, granulated sugar, flour heavy cream, zest, juice and salt in a bowl until well combined.

Remove the crust from the oven, whisk the filling again, then pour filling over the hot crust. Bake until the filling is just set, about 16 minutes. Transfer pan to a rack to cool.

Refrigerate bars, covered, until cold, at least 4 hours. Just before serving cut the bars into small squares then sift the confectioner's sugar in a thick layer over bars.

Yield: 48 bars

Wednesday, November 5, 2008

Snickerdoodle Days

Some days are just baking days. Today was gray with skies threatening a sputter of rain all day and that my friends is what I would classify as a baking day.

I baked something I haven't made in years: Snickerdoodles.

Snickerdoodles are cinnamon flavored sugar cookies with slightly crackled tops, tender crisp edges and slightly soft and chewy centers. Oh and they're delicious. I've never met a Snickerdoodle hater...I just don't think it's possible to be a Snickerdoodle hater. It's classic spicy sweet flavors appeal to everyone young and old. I wish I could remember whose blog I saw it on but I remember seeing something about Snickerdoodle Ice Cream somewhere...oh I would love to have that. Does anyone remember seeing that?

This Snickerdoodle recipe calls for Cream of Tartar which I was amazed to find out comes from wine! No wonder I love Snickerdoodles(!) It's actually a crystalline acid that forms on the side of wine barrels. According to Gourmet Slueth the barrels are scraped and the sediment is purified and ground into cream of tartar...who thought to themselves let's put wine barrel scrapings into food?

For this version I decided to use pumpkin pie spice to roll the cookie balls in...but feel free to stick to the traditional cinnamon if you prefer or try other spices like chai or garam masala. I also decided to use a food processor instead of a mixer.

Snickerdoodles
3/4 cup butter, softened (1 1/2 sticks)
1 cup sugar
1 large egg
1 teaspoon vanilla
2 cups all purpose flour
1 teaspoon cream of tartar
1/2 teaspoon baking soda
1 tablespoon sugar
1 1/2 teaspoons pumpkin pie spice
Preheat oven to 400 degrees. Line 2 baking sheets with parchment paper.

Place the butter and sugar in the bowl of a food processor; pulse until light and fluffy.
Add the egg and vanilla and pulse until incorporated.

In a medium sized bowl whisk together the flour, cream of tartar and baking soda.
Add the dry ingredients to the food processor and pulse until combined.

Stir together the sugar and the pumpkin pie spice on a small plate or waxed paper. Roll the dough into 1-2 inch sized balls then roll in the sugar and spice mixture.
Arrange dough balls on the baking sheets
and bake in the oven for 8-10 minutes or until edges are lightly browned. Transfer cookies to wire racks to cool.

Monday, November 3, 2008

Surplus Candy Bars

Halloween has come and gone, the jack-o-lanterns have been tossed and the Halloween decorations packed up for next year. What's left? Bags and bags of candy.

Not only are you left with extra bags that you over-eagerly purchased from anticipating hordes of trick or treaters that in my case didn't come, but if you have kids who went trick or treating, your left with giant bags of assorted candies haunting you with visions of children's stomach aches and hefty dental bills (why exactly to I love Halloween so much?).

I heard on the radio today that there is a dentist in New York City that is offering to take the candy off of your children's hands by paying them per pound of candy turned in-our family Orthodontist has a similar plan but you get tokens for gift cards. But aside from a few thoughtful dental care providers what's a mother to do??

1. Let them eat as much as they want on Halloween night then take the bag and just toss it.
2. Keep the bag for them in the kitchen and dole out candy in a miser like fashion on a daily basis.
3. Let them choose a few of their favorites then donate it to a teacher to use as rewards at school.
4. Let them choose a few of their favorites then donate it to a shelter.

The first option seems rather cruel not to mention wasteful, they did after all work (sometimes for hours) "begging" for this candy which was in fact purchased by some neighbor's hard earned money. The second option while on the surface seems like the logical choice, I know I've read in countless magazines that it would not be a dentist's first choice-think about it-a daily, steady flow of sugar-yeah, maybe not such a good idea.

Myself, I like the last two, but perhaps with a few variations. I like to pull out some of each kids' favorites put them in a Ziploc bag and save them for when we go to the movies. (Yeah, I know, I know, no outside food-but that's the (only) beauty of fun size: they fit inconspicuously into your purse and at $13.00 a movie ticket, I'm bringing snacks in my purse!)

I also like to use a bunch for baking. Sunday night we had a church function to attend and I needed a quick dessert so I came up with a trick-or-treat bag riff on the ubiquitous potluck dessert 7-Layer bars. The bars came out super tasty and reduced my daughter's trick or treat bag quite nicely.

What ideas do you have for surplus candy bars? (And don't say eat them yourself!)

Trick-or-Treat Bag Bars
1/2 cup butter (1 stick)
1 1/4 cup finely crushed pretzels
1 cup grated coconut
3 cups assorted chopped candy (I used Butterfingers, Snickers, Special Dark, Hershey Bars, Crunch, Twix and Kit Kat)
1 can sweetened condensed milk

Preheat oven to 350 degrees.

Place the butter in a 13 x 9 inch glass baking dish and melt the butter in the preheating oven.

Add the pretzels, coconut and candies in even layers-without stirring. Pour the sweetened condensed milk evenly over the layers. Bake for 25 minutes. Allow to cool completely before cutting into bars.